Automatically Hide Sensitive Information Before Sending Data to ChatGPT, Claude, or Gemini
Key Points Summary
- Set up a system to automatically hide sensitive information before reaching AI models
- Integrated Microsoft Presidio for automatic PII detection and masking
- Configured LiteLLM as a proxy server for multiple AI models
- Used Open-WebUI as a customizable front-end interface
- Implemented automatic masking of names, emails, phone numbers, and sensitive data
Introduction
Have you ever worried about sharing personal information when using AI chat services? When you automatically hide sensitive information like your name, email address, or phone number before chatting with ChatGPT, Claude, or Gemini, you can protect your privacy while still benefiting from these powerful AI tools.
As someone who works with sensitive information daily, I needed a solution that would let me leverage powerful AI models while maintaining strict privacy controls. The challenge seemed straightforward: how could I automatically hide sensitive information before it ever reaches the AI model?
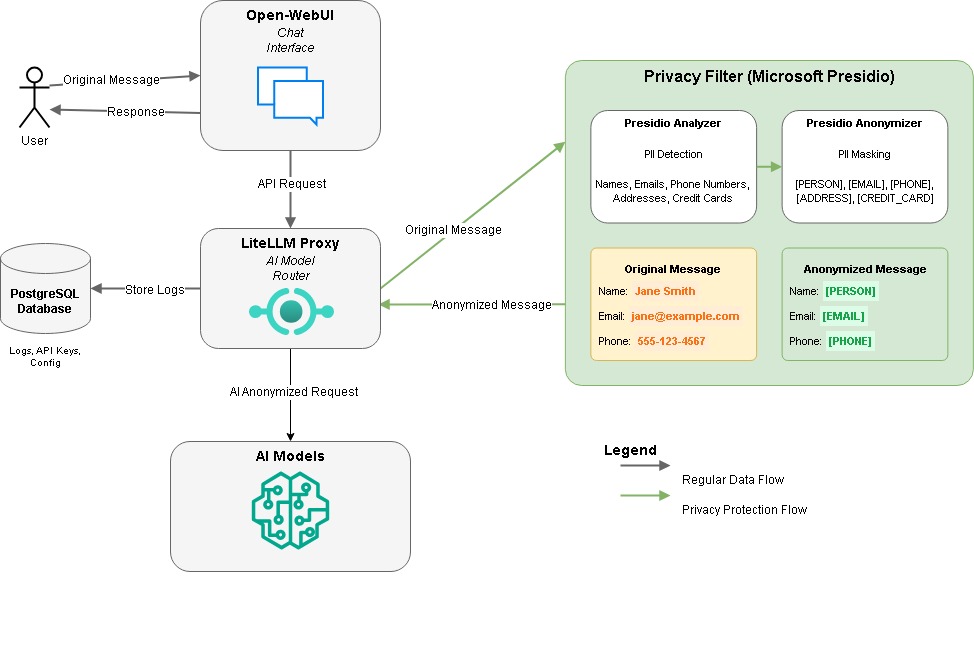
In this article, I’ll walk you through exactly how I built a system to automatically hide sensitive information by combining three powerful tools: Microsoft Presidio for PII detection, LiteLLM as a proxy for AI models, and Open-WebUI for a user-friendly interface. By the end, you’ll understand how to set up your own system that automatically transforms “My name is Jane Smith and my email is jane.smith@example.com” into “My name is [PERSON] and my email is [EMAIL_ADDRESS]” before sending it to any AI model.
Setting Up the Environment to Automatically Hide Sensitive Information
I’ll be using Docker Compose to orchestrate all the necessary services on a Linux system. This approach makes deployment straightforward and ensures everything works together seamlessly to automatically hide sensitive information in your AI interactions.
Creating the Directory Structure
First, I created a dedicated directory for the project using these Linux commands:
mkdir litellm-presidio-setup
cd litellm-presidio-setup
The Docker Compose Configuration
Next, I created the Docker Compose file with the nano editor:
nano docker-compose.ymlAnd added the following configuration:
version: "3.9"
networks:
  compose_default:
    driver: bridge
    driver_opts:
      com.docker.network.bridge.name: br-litellm
    ipam:
      driver: default
      config:
        - subnet: 172.19.0.0/24

services:
  # PostgreSQL Database
  postgres:
    image: postgres:15
    container_name: postgres
    networks:
      compose_default:
        ipv4_address: 172.19.0.5
    volumes:
      - postgres-data:/var/lib/postgresql/data
    environment:
      - POSTGRES_USER=${POSTGRES_USER}
      - POSTGRES_PASSWORD=${POSTGRES_PASSWORD}
      - POSTGRES_DB=${POSTGRES_DB}
    restart: unless-stopped
    healthcheck:
      test: ["CMD-SHELL", "pg_isready -U ${POSTGRES_USER} -d ${POSTGRES_DB}"]
      interval: 10s
      timeout: 5s
      retries: 5
      start_period: 10s

  # LiteLLM Proxy Service
  litellm:
    image: ghcr.io/berriai/litellm:main-latest
    container_name: litellm
    networks:
      compose_default:
        ipv4_address: 172.19.0.10
    ports:
      - "4000:4000"
    volumes:
      - ./litellm-config.yaml:/app/config.yaml
    environment:
      - LITELLM_MASTER_KEY=${LITELLM_MASTER_KEY}
      - LITELLM_SALT_KEY=${LITELLM_SALT_KEY}
      - PRESIDIO_ANALYZER_API_BASE=http://presidio-analyzer:3000
      - PRESIDIO_ANONYMIZER_API_BASE=http://presidio-anonymizer:3000
      - DATABASE_URL=postgresql://${POSTGRES_USER}:${POSTGRES_PASSWORD}@postgres:5432/${POSTGRES_DB}
      - OPENAI_API_KEY=${OPENAI_API_KEY}
      - ANTHROPIC_API_KEY=${ANTHROPIC_API_KEY}
    command: [ "--config", "/app/config.yaml", "--port", "4000", "--num_workers", "8" ]
    restart: unless-stopped
    depends_on:
      - postgres
      - presidio-analyzer
      - presidio-anonymizer
    healthcheck:
      test: ["CMD", "curl", "-f", "http://localhost:4000/health"]
      interval: 30s
      timeout: 10s
      retries: 3
      start_period: 20s

  # Microsoft Presidio Services for PII Detection and Masking
  presidio-analyzer:
    image: mcr.microsoft.com/presidio-analyzer:latest
    container_name: presidio-analyzer
    networks:
      compose_default:
        ipv4_address: 172.19.0.11
    ports:
      - "5002:3000"
    restart: unless-stopped
    healthcheck:
      test: ["CMD", "curl", "-f", "http://localhost:3000/health"]
      interval: 30s
      timeout: 10s
      retries: 3
      start_period: 20s

  presidio-anonymizer:
    image: mcr.microsoft.com/presidio-anonymizer:latest
    container_name: presidio-anonymizer
    networks:
      compose_default:
        ipv4_address: 172.19.0.12
    ports:
      - "5001:3000"
    restart: unless-stopped
    healthcheck:
      test: ["CMD", "curl", "-f", "http://localhost:3000/health"]
      interval: 30s
      timeout: 10s
      retries: 3
      start_period: 20s

  # User Interface
  open-webui:
    image: ghcr.io/open-webui/open-webui:main
    container_name: open-webui
    networks:
      compose_default:
        ipv4_address: 172.19.0.20
    volumes:
      - open-webui:/app/backend/data
    ports:
      - "3000:8080"
    environment:
      - WEBUI_SECRET_KEY=${WEBUI_SECRET_KEY}
    extra_hosts:
      - host.docker.internal:host-gateway
    restart: unless-stopped
    healthcheck:
      test: ["CMD", "curl", "-f", "http://localhost:8080"]
      interval: 30s
      timeout: 10s
      retries: 3
      start_period: 30s

volumes:
  postgres-data:
    driver: local
  open-webui:
    driver: local
This configuration sets up five main services for our privacy-first AI chat system:
- PostgreSQL: A database to store LiteLLM’s configuration, API keys, and usage logs
- LiteLLM: The proxy server that connects to various AI models
- Presidio Analyzer: For detecting PII in text
- Presidio Anonymizer: For masking detected PII
- Open-WebUI: The user interface for chatting with AI models
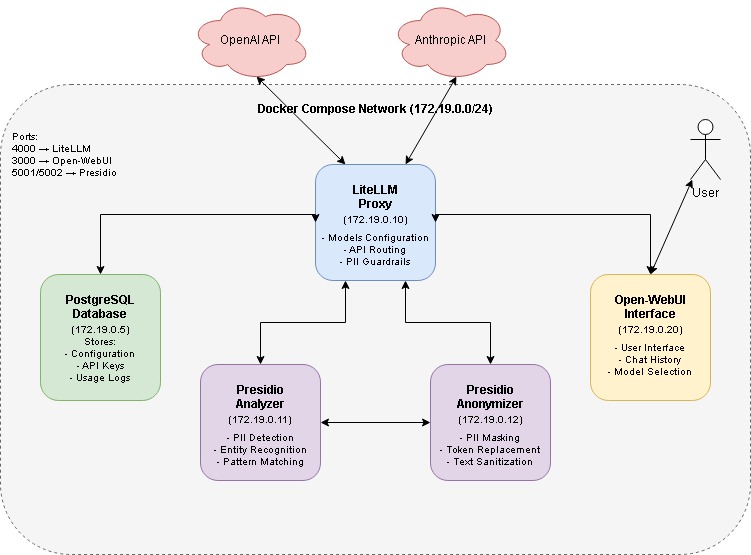
One important detail I learned the hard way: the Presidio services internally use port 3000, even though we’re mapping them to ports 5001 and 5002 externally. This is crucial for proper communication between the services.
Setting Up Environment Variables
Next, I created a .env file to store configuration variables:
nano .envAnd added the following content:
Unlock this exclusive content by becoming a member. Register for free to continue reading. NO SPAM
Register for Free (takes 1 minute)Unlock exclusive content by becoming a member
Register for free to access all member-only content. No spam, ever.
Leave a Reply